Showing posts with label DECOUPAGE. Show all posts

Sunday, 16 March 2014

Waterfall Card - recycle cupcakes

Hi Bloggers,
Recently I had my card classes and I thought I can make a Card in a BOX for a mothers day. Just because MY Mother's day is on 26th May, I though i can make it as a birthday Card for my friend. And this is how it came up.


it is very fun and easy way to make your card extra special.

click the link to see the INSTRUCTIONS  on     "How to make it"

Thanks for stopping by.
Elzbieta

Tuesday, 1 October 2013

Purple pot

Hi. the weather is really nice lately and even if it is a Autumn it is still nice outside. I look forward to go out and see how the world has change its colours. my card does not have Autumn colours but it looks good with this time of a year. It is happy and simple. made with some SU stamp (I stamped image at my friends house and forgot it I have it, found with nor name of set ... sorry) papermania markers, random papers and white base card, completed with gem stones and stickers and ribbon.


 I just love haow it came out so clean and simple.

hope you like it too.

Tuesday, 3 September 2013

Christmas #13 September I

hello Bloggers.
Just to update my status at CCC at Splitcoaststampers with my new Card for Christmas. I did it some time ago and did not have a chance to post it. So this month would be just as good as any other.
Anyway, the weather is getting worst so I need some cheerful colours to keep me happy till Christmas. Hope you like my colours too...


Enjoy!
Elzbieta

Sunday, 1 September 2013

3 Step card

On my card I used one of the lady stamps from my collection. It is my first attempt to make a 3 step card. I used 2 flower punches to make a flowers, some circle sticker to add a shine, red ribbon, a stamp which I have from Ally Pally, corner and border punch from SU and chocolate chip paper from SU as well.
 I like that stamp a lot, I will probably use it again in future.

 here you can see I layered her dress to add some dimensions ....

thanks for looking.
Elzbieta

Tuesday, 27 August 2013

Thanks

Hi. I am not fan of sequins but these ones are really pretty and I decide to make a card.
I put a strip double side type and fill it with sequins. than I saw them with black thread, and to finish it I used diamond dust to make it sparkly.
I stamped flowers with white ink, and colored in the picture.


Enjoy.
Elzbieta

Sunday, 25 August 2013

Christmas #12 August II

Hi. How nice it is for me I almost have a all the Christmas cards for this year. Here is my another card for August and is the last one for this month. still 8 to go to finish this year plan. Hopefully I will be able to finish all of them with my 2 little once running around.

I used one of the SU stamps. I do not have it, it is from my friend stash so I do not know how it is called- sorry for that. the rest is just inspiration. I hand draw christams decoratiosns and addesd some glitter.

Enjoy!
Elzbieta

Tuesday, 30 April 2013

Baby photo swirl

Good Morning, Here is a card made of few photos. I love it how it came out. I cover baby face as it is private photo. This is a perfect gift for a Christmas, Easter, Birthday, Christening or just a general baby card if you like to make it extra special.


Tuesday, 23 April 2013

Easter cards from 2008

hello, here is few of my old Easter cards which I made when I had more time ;) this was an inspiration from one of my old sketches. I sow it in one of the shops on high street i window - it was originally a decoration for Easter but I liked the how they put clothes together , made a sketch of it for my Easter cards and ... here how it turned out.


I was a little lazy and did not want to divide people so i decide to do all the same. WOW ... this was very time consuming but it was worth it at the end ... :) love it !!!


thanks for looking and comments!!!
Elzbieta

Wednesday, 3 October 2012

Potek z kwiatkami

Hello All,

Today I have a very nice treat for all my followers. I made this special present for my friend last year and forgot about it. However, all those lovely people who are following me or wish to follow I have a nice treat - I will send you the instructions on email if you want to know how to do it. Very easy and looks much better in real. It is perfect present for all occasions and you can make it in every possible colour. 

I will not put instructions on my blog, as this is a special present for people who are following me.


let me know if you like it (just leave comment) and email me to get the instructions for it. 

Thanks for looking.
Elzbieta

Tuesday, 2 October 2012

Blue sleigh

Hi,
Fantastic news today my little Mr has another tooth :) I am so proud of him. I have been waiting for another ones to come out for over 3 months and yet they there are. I can see next one close to this one so he will have second one on the top ..... ufffff .......... this waiting is going to kill me. I look forward to see them grow as I keep diary of them coming out.


Anyway, today is Tuesday and here is another Christmas card. Blue sleigh.

DIY:
I had a 6"x6" paper with this picture. So not to be very simple and stick it just on to the card I cut it on smaller squares and than mount id to the card base.


I added extra dimension by pitting some fake snow on the roofs and making some glitter dots as tiny snow.

 I hope you can see all this on the picture above.

thanks.
Elzbieta

Sunday, 9 September 2012

Sexy old fashioned ....

Hi All,
Lovely Sunday today - everything is nice and sunny. I was hoping that it will stay that hot until next month :) this would be my dream come true for this Summer year.
My today's card is inspired by old fashion lace - you know the one that women had in their dresses.It looks lovely and really Girly. I loved it.


DIY:
White card base 5"x7". cut a piece of scrap pattern paper. cut a white piece of paper and punch edge whith your favourite edge puncher (my is scalop and I added holes with normal paper punch). take ribbon and put through the holes. tie a knot at the end. Punch 4 flowers (SU flower punch) . Ink edges whit white ink. add buttons as centre of flowers. now stick white paper to patter papaer. everything fix to car base. add flowers to finishe the card.

Thanks for looking.


Sunday, 8 July 2012

Flower 6

Hi there, today is the day that you want to go out but the weather is not just the best. well, I had this day today. unfortunately, My hubby and my sister drag me out of the house and took to swimming pool. I was worth it :) so I had and idea to make a card which will cheer me up. - sunshine card :) tak a look.


This car was made from all my scraps. Punch out in 2 different colors petals of the flower. I used crinkle machine to make the wave look. punch two leaves in olive. cut a olive sting. mount white base 5"x7". cut yellow card and certain celery and white (I used my scrap paper which was already embossed). round 2 corners. mount pale blue card on white, add the ribbon. to finish the card i cut out circle from white paper add double sided tape and cover it in small beads. Stick it as a middle of a flower. now I used  dimentionals to mount flower. sentiment is the last piece on the card. there you have it . sunny card for today. hope you enjoy it.

Sunday, 27 May 2012

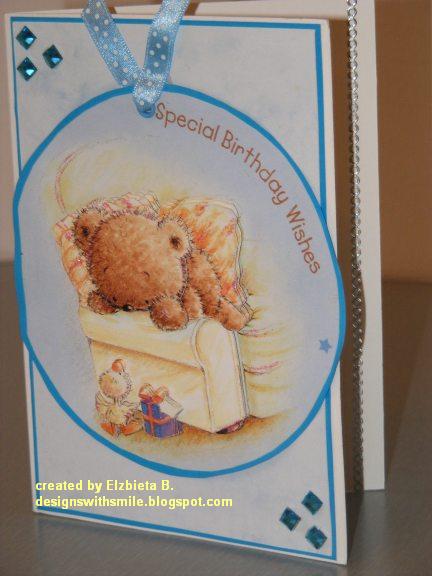
Decoupage - Blue Bear

Hi All,
This is one of my first cards that I made being in England and discovering all those beautiful chances to make cards. This card was made from scraps, and from collections of my wrapping papers :) How do you like this ??  even wrapping paper can be creative ;)  It is made as decoupage - I am not sure if it will look like it on the picture.


DIY:

Everything was prepared before I glue the pieces together. This card is decoupage.
I picked i wrapped paper with bear design, and I glue few of those pictures onto white scrap paper I got. I choose which piece of a picture I needed. When everything was dry I mounted it together.

I used blue paper from my random paper stack. mounted to card and added another piece of light blue paper. I mounted with dimensionals separately the bear :
1. cut a circle from wrapping paper where you have a picture.
2. added a bear with a arm of armchair.
3. add head and hands
4.add hands, as well a present on the floor and the duck

the sentiment was already on the wrapping paper.. At the end I glue the diamonds and added the piece of ribbon.
Related Posts Plugin for WordPress, Blogger...